Showing posts with label legumes. Show all posts

Wednesday, March 1, 2017

Black Lentils with Black Rice & Black Shiitake Mushrooms


Four exceptionally nutritious ingredients form the core of this simple but delicious meal, perfect for warming up the last chilly days of winter. According to the principles of Traditional Chinese Medicine, these four foods have the ability to strengthen the "yang" energy of the body, which is created and nurtured in the area called the "Life Gate Fire", or  Ming Men Huo. 

Assembly is easy; simply measure the ingredients into a pot and cook for about one hour.  It's best to use a heavy pot with a thick bottom and tightly fitting cover. A simple kitchen tool called a flame tamer or heat diffuser is useful for cooking legumes and grains; it helps heat to penetrate evenly without scorching the bottom of the pot.  Slow, gentle cooking allows the grains and lentils to steam thoroughly and encourages the aromatic flavors to mingle.

 Yield: Roughly five servings.

Ingredients:

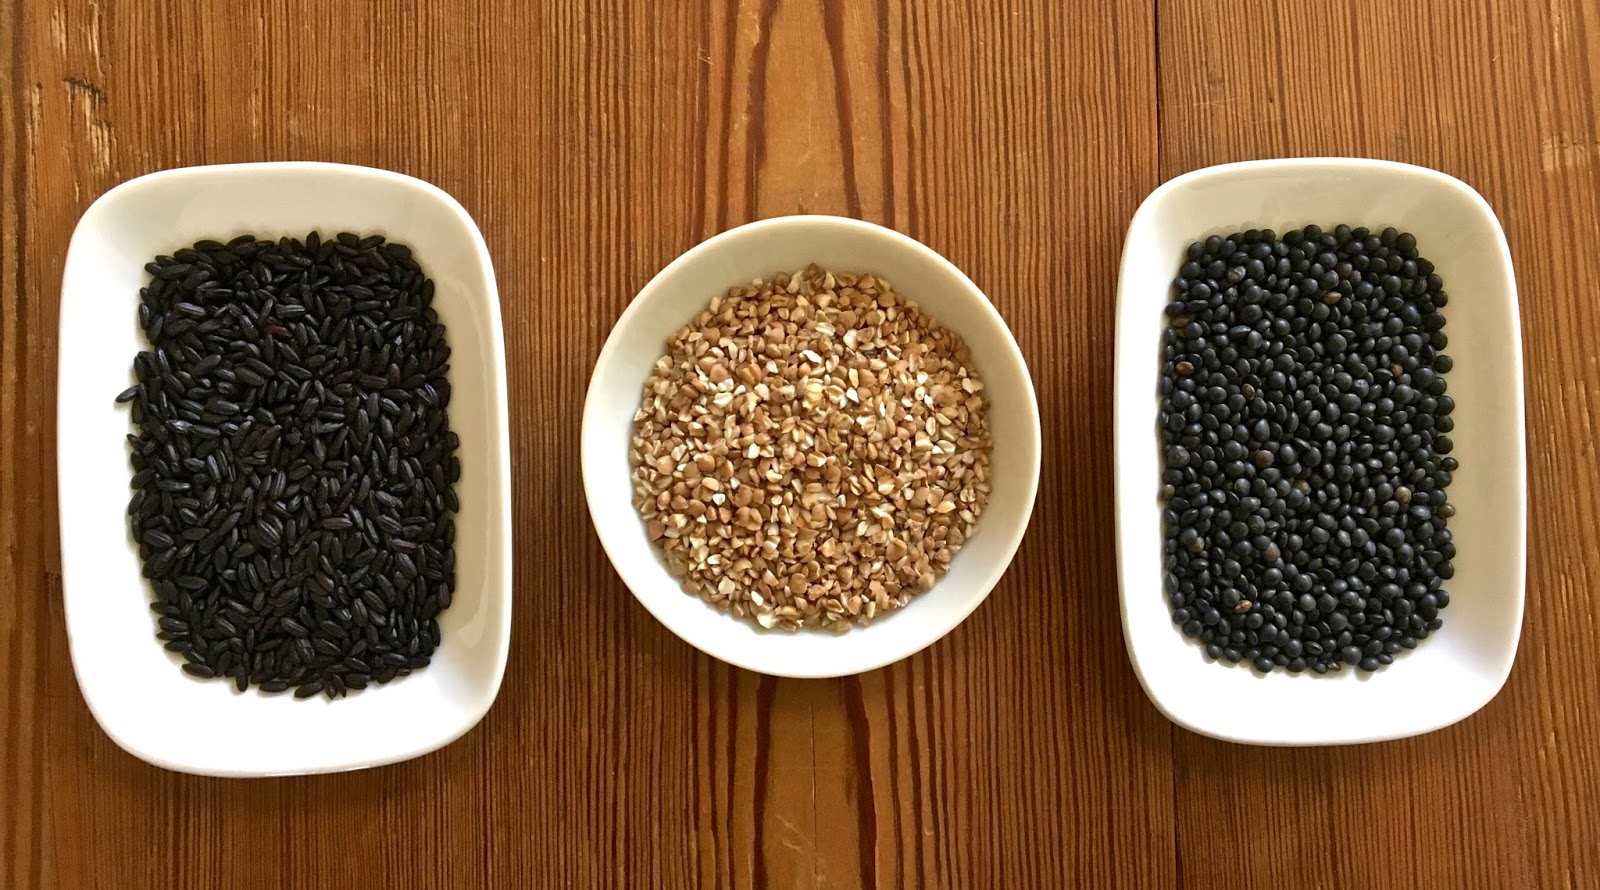
1 cup black beluga lentils
1 cup black "forbidden" rice
1/2 cup kasha (buckwheat groats)
2 whole garlic cloves, unpeeled
1 bay leaf
5 cups fresh water
1/4 + teaspoon  sea salt
6 whole dried black shiitake mushrooms


Method:

Measure lentils, rice, kasha, water and sea salt into the pot; add garlic and bay leaf.
Carefully place mushrooms, stem down, in one layer on top of the other ingredients.
Cover pot and bring to a gentle simmer. Place a flame diffuser under the pot to prevent scorching.
Continue cooking on a low to medium flame for about one hour.  
Remove pot from heat and allow to rest without opening for fifteen or twenty minutes.
Open pot and remove mushrooms, garlic cloves and bay leaf.
Place mushrooms on a cutting board and slice into small pieces.
Peel garlic- it will be very soft- and return it and the mushrooms to the pot.
Toss all ingredients with a fork; add more sea salt to your taste if desired.
Serve with any lightly steamed dark leafy green.


Wednesday, January 18, 2017

Korean Comfort Food: Sweet Azuki Porridge


Azuki bean porridge, Pat Juk, is a traditional staple of Korean cuisine, eaten year round at all times of day. The sweet variety, Dan Pat Juk, is prepared and shared with neighbors and friends on "Little Lunar New Year" which takes place on the winter solstice. The reddish color of the porridge is meant to ward off evil spirits, and as in many cultures, eating sweet foods expresses the hope of a sweet year to come.

Savory or sweet, Azuki porridge is a sublime comfort food which is highly nutritious and simple to make. This interpretation of Dan Pat Juk requires few ingredients and the only active labor involved is the time it takes to blend the cooked beans into a smooth porridge. Traditional Korean recipes call for rock sugar as the sweetener; I've substituted medjul dates. For a sweeter dish, maple syrup may be added to taste.

Dan Pat Juk is very filling; this recipe yields roughly six modest servings. The flavor of the juk mellows with rest, so don't hesitate to make extra for later use. To store cooked beans safely, place in clean glass jars with tightly fitting lids while still very hot. I like to use small single serving sized glass canning jars for this purpose. Handled this way, beans will keep well in the fridge for up to five days.

Ingredients:

2.5 cups azuki beans, soaked for about 6- 8 hours*
fresh water
4-5 large medjul dates, pitted and sliced in half
sea salt to taste
1 or 2 tablespoons maple syrup to taste (optional)
mint leaves for garnish
pine nuts for garnish

Method:

Drain and rinse beans thoroughly in running water.
Place beans in a heavy bottomed pot and add enough fresh water to cover by about two inches.
Bring to a simmer, cover and cook over a medium- low flame for one hour or more.
Stir beans occasionally, adding water if they are not covered by liquid.
Beans are done when one is easily mashed between thumb and forefinger.
Remove pot from heat, stir in dates, cover and allow to rest until cool enough to blend.
Blend beans in batches in blender, adding cooking liquid or small amounts of fresh water as needed, until porridge is velvety smooth.
Return porridge to pot, reheat thoroughly and add sea salt to taste.
One or more tablespoons of maple syrup may be added to taste.

Serve dan pat juk  in small preheated ceramic bowls.
Garnish with a sprig of fresh mint and a sprinkling of pine nuts.
Store remaining porridge in glass jars in fridge for up to five days.
Reheat thoroughly for a quick, warming and energizing meal.


*A note about soaking legumes:  Soaking legumes is not a complicated affair but it involves some planning. Soak beans overnight or put them in to soak early in the morning. If you've soaked beans for several hours but must postpone cooking, drain them and keep in the fridge for up to another day. 


Thursday, February 18, 2016

Black Orca? Calypso? Vaquero? It's a bean.


Black Orca, Calypso, Vaquero, Yin Yang; these are all names for this attractive black and white speckled heirloom bean which is a member of the Phaseolus vulgaris family.  In recent years many varieties of heirloom beans have become widely available and are prized for their beauty, smooth texture and subtle flavor.

Humans have cultivated beans since the advent of agriculture millennia ago. For many cultures they are the primary source of protein and other essential nutrients and are eaten at almost every meal. In subsistence farming communities, beans are cooked daily under very rudimentary conditions, often over an open fire. To create richly flavorful beans, all that is needed is a pot with a lid, a source of heat and a few simple ingredients.

Home Cooked Heirloom Beans:
 
Soaking time: Overnight or 6-8 hours.
Assembly time: Less than five minutes.
Cooking time: About one hour.

Ingredients:

2 cups dried heirloom beans, soaked and rinsed
5 cups fresh water
2 bay leaves
3 cloves garlic
1 medium onion
1/2 teaspoon sea salt (or to taste).

Method:

Sort through beans and remove any foreign matter.  Place beans in a heavy bottomed pot and add enough water to cover. While soaking they will absorb some of the liquid so there should at least one inch of water above the level of the beans.  Soak overnight or for 6-8 hours. (You can skip the soaking and plan on extra simmering time.)

Drain beans and add fresh water. Cover and bring to a boil. Lower heat, add bay leaves, garlic cloves and onion. (The garlic and onion can be peeled before or after cooking.) Simmer gently until the beans are tender but not mushy.  Stir occasionally and make sure beans are not sticking and are mostly covered in liquid; add a little water if necessary. Cooking time is roughly one hour depending on the freshness of the beans.

When beans are tender, turn off heat. Remove bay leaves and garlic cloves. Mash garlic cloves in a bowl with some beans and their broth, mix well and stir back into the pot. Add sea salt, taste and adjust seasoning. Serve warm beans in their savory broth, garnished with freshly cracked black pepper. Any steamed or braised leafy green will compliment this dish.


Monday, June 8, 2015

Basic Black: Beluga Lentils


These beautiful tiny black lentils, which are named for the Beluga caviar they resemble, are deeply flavorful and high in protein, vitamins, minerals and fiber. Lentils require no pre-soaking and since Belugas are so small, they cook thoroughly in thirty minutes or less. A batch prepared ahead of time can be stored for several days in the fridge,  ready to become a satisfying meal in minutes. 

Basic Black Beluga Ingredients:

3 cups black beluga lentils
6 + cups fresh water
3 cloves garlic, unpeeled
2 bay leaves
1 teaspoon sea salt (or to taste)

Method:

 Place lentils and water in a heavy pot with a well fitting lid. Bring to a boil, then lower flame so that lentils are gently simmering. Add garlic, cloves and bay leaves. Cover and allow to simmer for about thirty minutes. If you have a flame tamer, place it between the burner and the pot to distribute heat evenly and prevent scorching.

Stir lentils occasionally and add a little water if needed. Lentils are done when tender.  Remove garlic cloves and place in a bowl. Mash the cloves with a fork; the garlic skins will separate easily. Stir the mashed garlic back into the pot. Add sea salt to taste. While lentils are still hot, place them in clean glass jars and cover tightly. Lentils handled this way will keep well in the fridge for up to one week.


Serving suggestions:

1. Steam or saute any dark leafy greens which you have on hand; serve with hot lentils.
2. Chiffonade a stack of leafy greens. Place the ribbons in a layer on top of lentils as they heat in a covered pot. When greens have wilted, remove and serve with lentils.
3. Puree lentils in blender, thinning with some water or plain unsweetened nut milk. Heat and serve.
4. Toss a few tablespoons of chilled lentils into your favorite raw salad.

Garnishes:

Try any one or a combination of these garnishes: Freshly squeezed lemon or lime juice, chopped red, orange or yellow sweet pepper, dried red pepper flakes, freshly ground black peppercorns, chopped cilantro, parsley or basil leaves. When sweet corn is is season, remove kernels (cooked or raw) from cob and add to lentils.


Black Belugas, ready to heat and eat.


Wednesday, February 20, 2013

Lemony Sesame Tahina Sauce


"What can I put on my vegetables to make them taste good?" is a question I often hear from patients. Although fresh vegetables should taste good all on their own, lemon sesame tahina will add a touch of luxury to almost any vegetable which finds its way your plate and palate. The flavor of freshly made tahina is far superior to anything store bought. Preparation time: eight minutes.

Sesame seed paste is made of ground up sesame seeds (raw or toasted). Straight from the jar it is dense, intensely flavored and not terribly appealing. But it can be magically transformed into a velvety sauce or dip by blending it with fresh lemon juice, garlic, olive oil, water and salt. (The word "tahina" is derived from the Arabic verb which means "to grind").

There are many traditional tahina recipes. The simple but authentic recipe below calls for a minimum of ingredients. It is my rendition of the fabulous tahina I've eaten on the streets of Tel Aviv, where it is served drizzled over a plate of "hummus fuul", an unforgettable hummus and fava bean dish.  Rich in flavor,  tahina is high in nutrients including protein, calcium, iron and omega-3 fatty acids.

Lemony Sesame Tahina Sauce:

3/4 cup sesame seed paste ( room temperature)
1/3 cup fresh lemon juice
1 clove garlic, peeled
1 tablespoon olive oil
3/4 cup fresh water plus extra as needed
1/2 teaspoon sea salt, or to taste

Place sesame paste, lemon juice, garlic and olive oil in the blender. Slowly begin to process on low, adding a stream of water as ingredients start to combine. Continue to blend and add water until tahina reaches the consistency you desire.  When sauce is smooth, blend in sea salt, then taste and correct seasoning if necessary.  Store tahina in a glass jar in the fridge until needed. Serve with fresh raw or cooked vegetables of your choosing.

Tahina is also a delicious garnish for lentils, black beans or other legumes. The beloved middle eastern staple, fuul mudammas, (fava bean stew) is often served with a generous portion of tahina.  To learn how to make  "Fuul Mudammas" see the earlier blog post by that name.

Dried fava beans for stew.


Tuesday, July 31, 2012

Traditional Guatemalan Black Beans


For the sake of friendship and hunger, I recently endured an ear- splitting evening at a trendy San Francisco vegan Mexican restaurant. One of my favorite urban rambles is the walk from the chilly Inner Richmond District  to the sunnier Mission, so on a late afternoon this summer I happily set off on foot to meet friends for an early evening meal. I arrived an hour later, hungry for conversation and in need of some serious nutrition.

Conversation was difficult (but not impossible) amid the din but to my surprise, my selection of a bowl of perfectly prepared Guatemalan style black beans turned out to be an inspired choice which triggered a weeks long black bean cooking odyssey. After some random kitchen experimentation and close questioning of native cooks, I eventually captured the singularly satisfying flavor I recalled from my travels in the highlands of Guatemala, where black beans are simmered daily in battered cookware on smokey wood fires.

What I had been slow to realize was the obvious-  there is no esoteric or secret ingredient in an olla of Guatemalan black beans; their goodness resides in the essence of the beans themselves and the utter simplicity of the preparation.  Beans, water, onion, garlic and salt are all that are required to make exceptional  frijoles negros, the pride of Mayan cuisine. 


Guatemalan Black Beans

2 1/2 cups black beans, picked over and soaked for at least 6 hours
5 - 6 cups fresh water
1 medium yellow onion, whole
3 whole garlic cloves, unpeeled
1 teaspoon sea salt 

Drain the beans and rinse well.  Place beans in a heavy cooking pot, add water and bring to a boil. Lower the flame so that beans are simmering gently, then add onion and garlic. Cover and continue cooking on a low flame for at least one hour or until beans are very tender.  Stir in sea salt, taste and correct seasoning.  Remove garlic cloves from the pot.  If you are a garlic lover, peel and mash the cloves and stir them back into the beans.

Serve the beans in their broth;  they need no adornment.  With the first taste, I smell the woodsmoke which drifts through the villages on the highland breezes, and in my mind's eye I see the blue tinted volcanic peaks surrounding Lake Atitlan.  Not far away, a rooster crows. Gracias, Guatemala!


Friday, May 25, 2012

Chick Peas: Simply Summer!


At the first hint of warm weather in Northern California, chick peas become a favorite staple in my kitchen.  Few foods of such humble appearance equal the chick pea in flavor, versatility and nutritional value. With a little preparation, these homely legumes are easily transformed into a variety of savory dishes.

Chick pea history dates back to what anthropologists refer to as the "Pre-Pottery Neolithic A" period (9500- 8500 BCE), which means that humans have cultivated chick peas since before the invention of pottery cooking vessels.  Fortunately, twenty-first century chefs are not confined to cooking with hot rocks and open flame; simmering a pot of chick peas today is a much simpler task than it was in the Neolithic age.

It's best to use chick peas which have not lingered in your pantry for too long. Aged beans may not cook completely no matter how long they simmer. Pick over the chick peas and remove any small stones or debris. Rinse well and soak in fresh water for at least six hours or overnight. Soaked chick peas should require less than an hour to cook thoroughly. Basic cooking instructions may be found here:  lisabsf.blogspot.com/2008/05/golden-garbanzos.html


Summer Chick Pea Salad:

My favorite summer chick pea recipes are those with the fewest ingredients. Left to my own devices, I can happily snack on chick peas with nothing more than a sprinkling of sea salt. Often I add just a few fresh basil leaves or mint leaves and little olive oil.  For something a bit more creative, start with a bowl of cooked and drained chick peas tossed with olive oil and fresh lemon or lime juice; add a few other seasonally available ingredients. Use the list below for inspiration:

olive oil
fresh lemon or lime juice
fresh basil or mint leaves
fresh marjoram or oregano leaves
baby spinach or arugula leaves
thinly sliced red onion
thinly sliced green onion
ripe tomato slices
ripe cherry tomatoes
sweet red, orange or yellow pepper slices
cucumber slices
kalamata olives
Hungarian paprika
hot red pepper flakes
toasted sesame seeds
umeboshi vinegar
freshly ground black pepper
sea salt


For healthy portable meals to take to work or school, use only a small amount of lemon or lime juice and other liquids so that ingredients don't leak in transit. Whole cherry tomatoes can be packed separately.  The quality protein and other nutrients in a chick pea lunch will keep you energetic and satisfied for several hours.


Monday, March 12, 2012

Split Pea Soup with Hungarian Paprika & Lemon


Thanks to the vagaries of San Francisco weather- often foggy in summer and rainy in winter- a steaming bowl of rustic, flavorful soup is welcome here almost year round. With a supply of dried split peas in the pantry this simple soup garnished with Hungarian paprika and lemon juice can be whipped up for a warming one- pot meal whenever the weather turns chilly.

Split peas are a high protein, low fat, quick cooking legume which require no soaking. Before cooking, place peas in a colander and pick over to remove any pebbles which may have been harvested along with the peas. Rinse peas briefly in fresh water and drain. Two cups of dried split peas cooked with a few aromatic vegetables will yield four or five servings of soup.


Split Pea Soup with Hungarian Paprika & Lemon

2 tablespoons olive oil
2/3 cup sliced leek or onion
1 rib celery, chopped
1 carrot, sliced
2 tablespoons parsley, chopped, plus extra for garnish
1 medium potato, cubed
2 cups dried split peas
5 cups fresh water
1 tablespoon white miso paste (or more to taste)
juice of 1 lemon as garnish
Hungarian paprika as garnish


In a soup pot heat olive oil and saute leek and celery for three or four minutes until fragrant. Add carrot, parsley and potato and continue to saute another two or three minutes. Add split peas and water, stir, cover pot and bring to a simmer. Lower heat and cook until split peas are tender, about 25 or 30 minutes. Stir occasionally to prevent peas from sticking to bottom of the pot. If necessary, add a bit more water. When peas are tender, remove about a cup of soup and place in a bowl with the miso. Stir soup and miso until fairly smooth, then return mixture to the pot. Taste and add more miso if needed. Serve soup with a few squeezes of fresh lemon juice, a dusting of good quality Hungarian paprika and a sprinkling of chopped parsley leaves.

Note: For a velvety smooth soup, process in blender before serving. Allow soup to cool a bit before blending. Extra soup will keep well for several days in fridge.

Pease Porridge Nursery Rhyme:

"Pease porridge hot, pease porridge cold,
pease porridge in the pot, nine days old.
Some like it hot, some like it cold,
some like it in the pot, nine days old."

-
British nursery rhyme, dated by some sources circa 17th century.


Sunday, January 22, 2012

Sweet Azuki ~ Sweet Lunar New Year


Welcoming the New Year with sweets is a tradition which crosses many cultural boundaries, and Asia is no exception. On the Lunar New Year, special sweet dishes are prepared for celebratory meals. Since beans symbolize both health and prosperity, azukis are a popular choice among Japanese chefs; their auspicious red color adds to the portion of good luck they promise.

The delicate, subtly herbal flavor of azuki beans is best enhanced by very simple preparation. This recipe is composed of just water, beans, sea salt and a sweetener to ensure that the taste of the azukis will not be obscured. Sugar is usually used to make traditional azuki desserts but I've replaced it with golden Sultana raisins to create a mildly sweet but satisfying dish.

Soak the beans for at least six hours in fresh water, or overnight. It's ok to leave the beans in their soaking water in the fridge for an extra day. The raisins are soaked for at least one hour to make them soft, but they too can be held for a day in the fridge. For convenient soaking, place the raisins in a clean glass jar with enough water to cover. Process the raisins with their soaking liquid in the blender until fairly smooth.

After soaking and rinsing, the beans are boiled twice in fresh water for one minute to rid them of any impurities or bitterness. It's easiest to use a stainless steel colander placed in the sink to safely drain off the hot cooking liquid.

Sweet Azuki Bean Paste (Tsubu- An)

2 cups azuki beans, soaked at least 6 hours & drained
fresh water to cover during 1 minute boiling
4-5 cups fresh water
2/3 cup golden raisins, soaked at least 1 hour in water & pureed with soaking liquid in blender
1/2 teaspoon sea salt


1. Place soaked and rinsed beans in pot with enough water to cover by about 1 inch.
2. Bring to a boil for one minute, drain off cooking liquid and rinse beans in cool water.
3. Repeat steps 1 & 2, being sure to rinse out the pot each time.
4. Return beans to pot, add 4- 5 cups fresh water and bring to a boil. Lower heat and simmer beans for 50 - 60 minutes or until soft. Add more water if needed during cooking.
5. Add pureed raisins and sea salt to beans; simmer on a low flame and stir until most of the cooking liquid is evaporated. The whole cooked beans will look like the bottom photo.
6. Turn off heat and mash some of the beans with a wooden spoon, leaving some beans whole if you wish; the finished dish will look like the top photo.
7. Cool beans by pouring them onto a ceramic or glass platter.

Serve sweet azuki in small dessert dishes; the flavor is best at room temperature. Drizzle with a little maple syrup to ensure an extra sweet New Year!

Thursday, January 5, 2012

Azuki? The Small Red Bean


The delicious and versatile small red bean known in Japan as azuki has long occupied an honored place in Asian cuisine where it is often the highlight of celebratory meals. First domesticated in the Himalayas, azuki, or hong xiao dou ("red small bean") in Mandarin, is in the same family as soy and mung beans. Introduced to the Korean Peninsula around 1000 BCE, azuki arrived a bit later in Japan, where it has remained a beloved food ever since.

Traditional Eastern Medicine considers the azuki a strengthening food with medicinal properties. It may be eaten during the cold winter months as a protective measure to support overall health; it would also be recommended for those with a lack of vitality and vulnerability to cold. In western terms, the azuki is highly nutritious and is a good source of protein, vitamins, minerals and fiber.

When sweetened, the mild flavor of azuki is transformed into a prized ingredient featured in a variety of Asian desserts. The beans are cooked, sweetened and mashed into a paste called an, which is used as a filling for buns and tea cakes. Taiyaki, a fish- shaped waffle stuffed with an can be savored fresh from the griddle in San Francisco's Japan Town. Osekihan, "honorable red rice" is made with azuki and sweet rice and is served on special occasions. The beans lend the rice a delicate pink hue which is reminiscent of cherry blossoms.

Many natural food stores and ethnic markets carry azuki. Select beans that are brightly colored, plump and unblemished. Simple recipes are best when cooking azuki, to allow the true taste of the small red bean to shine. Recipe to follow!

Wednesday, December 21, 2011

Winter Solstice Cassoulet: Squash & Anasazi Beans


The season of "the longest night" is upon us, when dark chilly days call out for warming, substantial foods like this savory cassoulet. Anasazi beans, winter squash and chile peppers imbue it with a distinctive southwestern flavor as well as many healthy nutrients. Adjust the level of spicy heat to suit your taste! Black beans, pintos, kidney beans or adzuki beans are all equally suitable for this dish.

Just two simple steps are involved in preparing the recipe. First the beans are simmered with the aromatic vegetables; then the squash and spices are added and cooked for a few more minutes. The cassoulet's flavor deepens with time; if made in advance it may be safely stored in the fridge for several days.

Cassoulet of Winter Squash and Anasazi Beans:

2 tablespoons olive oil
1 cup leek, finely sliced
1 rib celery, diced
1 large carrot, sliced
2 cups Anasazi or other beans, soaked and drained
1 bay leaf
5 + cups fresh water
1 medium winter squash, cubed
1-2 red chile peppers thinly sliced (optional)
2 teaspoons maple syrup (optional)
1/4 teaspoon powdered ginger
1/4 teaspoon powdered cinnamon
1- 2 teaspoons Hungarian paprika
1 teaspoon oregano or marjoram
1 teaspoon sea salt (or to taste)
1- 2 tablespoons fresh lemon juice for garnish
2 tablespoons fresh chopped cilantro or parsley for garnish
1-2 red chile peppers, thinly sliced for garnish

Heat olive oil in a heavy pan; saute leek and celery until fragrant. Add carrot and continue to saute briefly. Add beans, bay leaf and water and bring to a simmer. Cover beans and cook on a low to medium flame until just tender, about 45- 50 minutes. Stir in squash, chile pepper, maple syrup, ginger, cinnamon, paprika, oregano and sea salt. Simmer until squash is tender but not mushy, adding more water if needed. Remove from heat and adjust seasoning. Serve cassoulet very hot with a generous sprinkling of fresh lemon juice, chopped cilantro or parsley and additional chile pepper as desired.

Note: The backyard birds in my neighborhood seem to appreciate all manner of squash seeds when I am too lazy to prepare them for human consumption.

Monday, November 14, 2011

Healthy Eating on $4.50 a Day: Not a Snap!


A group of U.S. Congressional Representatives recently participated in "The Food Stamp (SNAP) Challenge" to draw attention to the plight of more than 45 million Americans currently receiving nutrition assistance. The representatives attempted to eat for seven days on a budget comparable to what the average recipient is allotted under SNAP, the Supplemental Nutrition Assistance Program in their respective states; in California that amount is $4.50 a day.

Inspired by their example but also disturbed by media reports of Congress persons subsisting on canned tuna, lettuce, white bread, pasta and hard boiled eggs, I decided to take up the challenge with the goal of eating a health supportive diet comprised almost entirely of high quality, unprocessed or minimally processed plant based foods.

Although it is not possible and was not my intention to replicate the circumstances of those who live month in and month out in truly challenging circumstances on a highly restrictive food budget, the experience was enlightening and humbling.

The photo above illustrates the typical selection of foods I ate during the seven day trial. By carefully planning, shopping and preparing all meals from scratch, it was possible to consume enough calories to maintain adequate physical energy, stave off hunger between meals and satisfy daily nutrition requirements.

However, it was a shock to discover how quickly I could exceed my daily budget simply by eating an extra piece of fruit, an added serving of peanut butter, soy milk or other snack. Lentils, brown rice and barley with vegetables provided satisfying and nutritious meals at a modest cost, but there was little or no room for unplanned grazing beyond the essentials.

It also became clear that the looming specter of food insecurity dramatically transforms one's relationship to eating. Even under the best of circumstances, the seven day challenge was far from a carefree experience and left me concerned about those for whom this is not an temporary experiment.

Basic food costs:

brown rice, 1 cup cooked $.37
barley, 1 cup cooked $.25
lentils, 1 cup cooked $.67
peanut butter, 2 TBSP $.21
peanuts, 2 TBSP $.24
sunflower seeds, 2 TBSP $.18
green tea bag $.16
plain soy milk, 1 cup $.50
banana, medium $.26
apple, medium $.55
orange, medium $.54
plum, small $.25
green beans, 1/4 lb $.50
carrot, medium $.29
winter squash, 1/2 $.59
arugula, 2 large handfuls $.42
sweet pepper, 1 small $.66


Note: Ingredients such as those used for preparing lentils included small amounts of leek, garlic, celery, olive oil, sea salt and dried herbs; these added little expense and therefore are not noted above.

Thursday, August 11, 2011

Cooking with Pressure: Fast, Healthy, Flavorful


Most younger Americans have probably never seen a pressure cooker, let alone used one. Pressure cookers had their heyday in the 1940's following their introduction at the 1939 New York World's Fair, but they were soon supplanted by the huge wave of convenience foods which swept the country in the 1950's, when most of those old cookers were relegated to basements and attics and forgotten.

But pressure cookers retained a place of honor in kitchens throughout much of Europe, South America, North Africa and India, where they are valued for making flavorful healthy meals which are also remarkably fuel and time efficient. The most beautifully designed sleek, safe and durable pressure cookers like the Italian one in the photo are made by European manufacturers; these contemporary stainless steel models last for a lifetime and are a pleasure to use.

Today the pressure cooker is again gaining recognition in the U.S. among cooks who appreciate the intense, concentrated and pure flavors created by relatively brief cooking under pressure. Dense vegetables like beets, winter squash, carrots and potatoes cook in roughly one third the time required by conventional cooking methods, as do legumes, brown rice, barley and other whole grains. Savory vegetable stews, soups and sauces which normally require slow cooking can be prepared in minutes using a single pot from start to finish.

I acquired my first Italian pressure cooker in 1982 and have used it year round since then. In warm weather I prepare garbanzo beans or white beans to use in fresh green salads with ripe tomatoes and herbs. In autumn when apples and pears are plentiful, I make apple- pear sauce with cinnamon and ginger; in winter, black beans and spicy red bean chile are often on the menu. Winter and summer, this dependable kitchen tool keeps the pressure in the pot where it belongs, and out of the kitchen.


Tuesday, January 4, 2011

White Bean & Barley Cholent: A Winter Cassoulet


During a recent chilly, rainy week I had a sudden yen for a bowl of cholent, the traditional slow simmered dish beloved by generations of European Jews and their descendants in the diaspora. Cholent typically contains a combination of beans, barley, potatoes and meat seasoned with onions and garlic; it is cooked overnight in a heavy covered dish and eaten as the main meal on Shabbat, the day of rest. Jews of Middle Eastern heritage prepare a similar recipe called hamin (Hebrew for "hot"); the equivalent North African dish is known as deffina.

Both cholent and hamin closely resemble the rustic French slow cooked cassoulet; in fact some sources claim that cholent was the predecessor of cassoulet and that etymologically, cholent is derived from the French words chaud (hot) and lent (slow). Much lively discussion can be had about the origins of cholent, its preparation and which ingredients are truly authentic, but what really matters is the final result: a satisfying, warming meal to be savored slowly in the cold days of winter.

This vegan rendition of cholent/ cassoulet is simple to assemble; it may be cooked on the stove top or in the oven. You may also begin the cooking process on the stove and continue it in the oven. Use a heavy pot with a thick bottom and a tight lid. The beans and barley need about an hour to cook thoroughly but the flavor will deepen with longer cooking. The ratio of beans to barley is flexible and may be altered to your taste. To slow bake in the traditional manner, set oven at 225 degrees and cook for at least three hours or overnight.


2 tablespoons olive oil
2/3 cup leek or onion, chopped
1 rib celery, chopped
2 cloves garlic, chopped
2 bay leaves
1+1/2 cups white beans, soaked 6- 8 hours
1 cup pearl barley
6 cups or more fresh water
1 large carrot, sliced into rounds
2 or 3 small Yukon Gold potatoes, quartered
1 teaspoon dried sage leaves
1/2 teaspoon sea salt (or to taste)
1- 2 teaspoons good quality paprika

In a heavy soup pot saute leek, celery and garlic in olive oil until fragrant. Add bay leaves, beans, barley and water. There should be at least one inch of water covering the beans and barley; most of the liquid will be absorbed during cooking. Bring to a boil and lower heat to a simmer. Place a flame tamer beneath the pot to ensure even heat and to prevent scorching. Allow to cook for at least 45 minutes or until beans and barley are tender, adding more water as needed. Layer carrot slices and potatoes on top of beans and barley, sprinkle with sage leaves, sea salt and paprika. Cover pot and allow to cook another 20 or 25 minutes or until vegetables are tender.

The finished dish will be very thick; serve in warm bowls garnished with a little chopped parsley or other green. Store cholent/cassoulet in glass containers in fridge for several days. For a quick meal heat thoroughly, adding water as needed to create a bowl of bean & barley stew as seen in the photo above.

Tuesday, August 10, 2010

White Bean Bisque with Fresh Herbs


White beans are a versatile staple which require little effort to prepare and which can be transformed into an endless variety of quick delicious meals. Cooking legumes is easy! Use dried beans which have not been stored in your pantry for too long; older beans may have less flavor and take longer to cook. Pick over the beans and soak in fresh water for 6- 8 hours or overnight; drain soaking water before cooking. Cook beans in a heavy soup pot; a flame tamer will distribute heat evenly and prevent burning.

This luxurious jade green soup is made in two simple steps. In the first, the beans are cooked; in the second the bisque is processed in a blender, heated briefly and served. The recipe calls for fresh herbs such as basil, Italian parsley, oregano or cilantro; a combination of two or three herbs works well but even one will suffice. (You can also use fresh spinach or arugula leaves in the same manner.) The herbs are pureed with the cooked beans, resulting in an aromatic bisque which may be enjoyed hot or chilled.


White Beans: Basic cooking method

2 cups cannellini or other white beans, soaked and drained
5- 6 cups fresh water
3 cloves garlic, whole
1 large bay leaf
2 ribs celery, whole
2 medium carrots, whole
2 fresh jalapeno or serrano peppers, whole


Place the soaked and drained beans in a soup pot with fresh water. Bring to a simmer over a medium flame, add remaining ingredients and cover. Allow beans to simmer gently until tender which will take 30- 45 minutes; add more water if necessary while cooking. When beans are done, remove vegetables from pot and set them aside to use later as you wish. Store beans and cooking broth in clean glass jars in the fridge for up to several days.


White Bean Bisque with Fresh Herbs


2 cups cooked cannellini beans
1+1/2 cups plain soy milk (approx)
1/2 cup broth from cooking beans (approx)
2 teaspoons white miso paste
(or 1/4 teaspoon sea salt, more to taste)
1 handful fresh basil, Italian parsley and oregano leaves
1 fresh jalapeno or serrano pepper, chopped

Place beans, soy milk and miso in blender and process until smooth, then blend in herbs and jalapeno. Add more liquid if needed; the bisque should not be too thin but the consistency is up to you. Extra herbs may be used for a more intense flavor.

Gently heat bisque until just warmed through; over heating will alter the delicate flavor and color of the herbs. Serve immediately in warm bowls; garnish with a few fresh oregano leaves.


Friday, June 25, 2010

Red Bean Chile: It's Hot!


When summer arrives in San Francisco and thick fog rolls through the Golden Gate sending a chill across the city, the time is right for a flavorful bowl of spicy red bean chile. Take some time on a gray afternoon to sink into this recipe which will fill your kitchen with the aroma of an authentic home crafted meal.

Although small red beans are my choice for this recipe, pinto, kidney, anasazi or azuki work equally well. It's best to use beans which have not been languishing in your pantry for months; aged beans lack flavor and may take longer to cook. Pick over the beans, rinse well and soak in fresh water for at least 6 hours before cooking. This recipe may be prepared a day or so before eating; its flavor will deepen overnight.

2- 3 tablespoons olive oil
1 cup leek or onion, thinly sliced
3 cloves garlic, minced
1 rib celery, thinly sliced
1 large carrot, thinly sliced
1 cup cilantro or Italian parsley, chopped
1- 2 large bay leaves
2 cups small red beans, soaked and rinsed
5- 6 cups fresh water
6 ounces tomato paste
1 tablespoon cocoa powder
1- 2 teaspoons crushed dried red chile peppers
1 tablespoon Hungarian paprika
1 tablespoon maple syrup
1 tablespoon dried or fresh marjoram or oregano
1 tablespoon dried or fresh basil leaves
1 tablespoon white miso paste

Heat olive oil in a heavy soup pot and saute leek, garlic and celery until fragrant; add carrot and cilantro and continue to saute briefly. Add bay leaves, beans and water, cover, and bring to a gentle simmer. Place a flame tamer under the pot and cook on a moderate flame for about an hour or until beans are tender, adding more water if necessary. Stir in remaining ingredients except miso; simmer for another 10 minutes. Place a few tablespoons of the chile in a bowl, add miso paste and blend; stir mixture into pot and remove from heat. Taste and adjust seasoning.

Serve hot in preheated bowls; garnish with your choice of chopped cilantro, chopped fresh ripe tomato, or your favorite salsa. Eat slowly; watch fog!

Thursday, May 20, 2010

Red Lentils: A 10,000 year old legume


When the legendary hunter Esau returned home to the family tent, famished from a day spent tracking game, he insisted on eating a bowl of lentils, not meat. "Let me swallow that red, some of that red stuff..." he said to his brother Jacob, who then gave him the lentils he was cooking. (Yes, there's much more to that story; you can look it up).

A valuable source of protein and other essential nutrients, lentils have been cultivated in the Near East since the Neolithic Era (circa 9500 BCE) making them one of the earliest crops domesticated by humans. In South Asia, home to a large vegetarian culture, lentils of many varieties are a daily staple for millions. Their versatility and satisfying flavor have created a remarkable culinary tradition from which every home chef can draw inspiration.

Red lentils are small and split into halves, making them among the easiest legumes to prepare as they require less than a half hour to cook. Once you learn this basic lentil recipe, create your own variations by incorporating your favorite spices and herbs. Dried red lentils will keep well in your pantry, ready for impromptu meals using any seasonal vegetables you have on hand. There is no need to pre-soak the lentils, but do pick them over and wash them before continuing preparation.


Red Lentil Soup

2 tablespoons olive oil
2/3 cup leek or onion, thinly sliced
2 cloves garlic, minced
2 dried red chile peppers, crumbled
2/3 cup cilantro or Italian parsley, chopped
1 rib celery, chopped
1 carrot, chopped
1 bay leaf
2 medium sweet potatoes, diced
2 cups red lentils
5 - 6 cups fresh water
1 - 2 tablespoons white miso paste (or sea salt to taste)
1 teaspoon Hungarian paprika
1 tablespoon fresh or dried marjoram or oregano
2 small zucchinis, thinly sliced
juice of one large lemon

In a thick bottomed soup pot, saute leek, garlic and chile peppers in olive oil until fragrant. Add cilantro, celery and carrot, and continue to saute a few more minutes on a medium flame; if needed add a bit more olive oil. Add bay leaf, sweet potatoes, lentils and water. Stir well, cover soup and bring to a gentle simmer. Stir occasionally and allow to cook on a low flame for 20- 30 minutes, adding more water if soup is too thick. When lentils are soft, remove about a cupful from the pot, place in a bowl and stir in miso, paprika and marjoram. Return miso mixture to the pot. Add zucchini slices, cover, and allow soup to rest for a few minutes on a very low flame without bubbling until zucchini is tender. Stir in lemon juice and serve in warm soup bowls garnished with lemon slices, chopped cilantro and more chile pepper.


Sunday, May 9, 2010

Fresh Favas are Fabulous!


Yes, I know. Preparing fresh fava beans is a lot of work. All that husking, steaming and peeling; the big mound of green pods which shrinks into a modest bowl of beans, the dark fava juice stains on your fingertips, the pile of empty husks to schlep out to the compost bin. But there's nothing as fabulous in the height of springtime as a bowl of delicate fresh fave to savor slowly after hard labor.

The fava season is very short and is awaited eagerly by aficionados. If you spot fresh favas in the produce market, take a generous quantity home or you may have to wait till next spring for another opportunity. Select unblemished pods and avoid any which have begun to split open or are too large, as this indicates that the beans are overly mature.

Shelling favas can be a pleasant meditative activity; sit with a bowl in your lap and enjoy the simple task of splitting open the pods and removing the beans. To cook, bring a pot of fresh water to a boil; add the beans and simmer gently for three to five minutes until just tender. Remove from heat immediately, drain and immerse in a bowl of cold water to prevent further cooking.

When cool enough to handle, remove the thin outer skin from each bright green bean (more meditation, more compost!) Place peeled favas in a bowl, sprinkle with olive oil, fresh lemon juice and a little sea salt. Serve immediately and with the first taste you'll agree that this fabulous slow food is worth every minute of preparation!


Health note:
A genetic disorder known as G6PD deficiency, most common in individuals of African, Middle Eastern and South Asian heritage, can cause critical illness following consumption of fava beans. For further information, please Google "favism" or "G6PD deficiency".

Tuesday, January 12, 2010

Fuul Mudammas: Middle Eastern Fava Beans


I first tasted fuul in a tiny Tel Aviv hummus restaurant where I was served a plate of indescribably fresh hummus accompanied by a few tablespoons of delicious large brown fava beans known in Arabic as fuul. I haven't eaten hummus of that quality since and have never forgotten it or the fabulous fuul. So when I noticed a bin of dried favas at my natural food store recently, I scooped some up and brought them home to cook.

Fava beans are a staple in much of the middle east; most sources refer to fuul as the national dish of Egypt, where it is slowly cooked overnight and eaten for breakfast. A uniquely shaped pot called a fuul qidra was traditionally used for soaking and cooking the beans. Fuul is well loved in Israel, Lebanon, Syria and Iraq, and has a long history in Persian culture. Generations of Sephardic Jews have prepared a dish which includes whole eggs carefully nestled among the fuul; it is cooked overnight and eaten on the Sabbath. Some sources state that fava beans date from Pharonic times; one notes that fuul is mentioned in the Babylonian Talmud (circa 500 C.E.)

Fuul mudammas is made of cooked favas served with a variety of garnishes which are added at the table. Mudammas is usually translated to mean "buried" which most likely refers to the method of placing the fuul qidra in the embers of the cooking fire overnight. The beans are cooked in water without any other ingredients. Seasonings and garnishes are presented in small dishes for the diners to choose from; lemon wedges, olive oil, chopped onion, garlic cloves mashed with salt, chopped parsley, cilantro, or mint, pickled vegetables and fresh tahini sauce are some of the many traditional garnishes for fuul mudammas.


Fuul: Cooking method


2 cups dried fava beans soaked 8 hours & drained
6 cups fresh water


Place beans and water in a heavy pot. Cover and bring to a gentle boil; simmer until beans are very tender. Cooking time will vary depending on the beans; it may take up to 90 minutes. Some recipes advise removing the skins of the beans after the first 20 minutes or so of cooking, which involves letting them cool, peeling them, and then returning them to the pot to continue cooking. (I have found unpeeled favas delicious when thoroughly cooked, but be warned that purists may object!)

When beans are completely tender, remove from heat. Take a cup or two of beans and some liquid from the pot and mash in a bowl with a fork, then return to pot. Serve fuul in individual bowls, garnished with any combination of the following: Fresh lemon juice, olive oil, chopped parsley, garlic cloves mashed with sea salt. Fresh tahini sauce, made with sesame paste, lemon juice, garlic and salt is also a perfect addition to a plate of fuul.  (Tahina recipe posted 18 February 2013).

Monday, July 27, 2009

Anasazi Beans: Spicy & Simple


This method is appropriate for preparing any heirloom or conventional dried beans. Pre- soaking the beans for at least 6 hours will decrease cooking time. I usually put beans in to soak in the early morning; rinse beans and check for small stones before soaking. Store cooked beans in clean glass jars in the fridge; they will keep for several days and can be used to create delicious simple meals in minutes. (This is the real reason for cooking beans ahead of time).

2 tablespoons olive oil
2/3 cup leek, thinly sliced
1- 2 stalks celery, thinly sliced
2-3 cloves garlic, chopped
1 carrot, sliced
2 tablespoons cilantro, chopped
1 bay whole leaf
1-2 dried red chile peppers
2 cups anasazi beans, pre-soaked & drained
5-6 cups fresh water
1 tablespoon mirin rice wine (optional)
1 tablespoon white miso paste
1 teaspoon maple syrup
1/4 teaspoon chile powder (more to taste)
1/4 teaspoon dried basil
1/4 teaspoon dried marjoram or oregano

In a heavy bottomed pot, heat olive oil and saute leek, celery, carrot and cilantro until fragrant. Add bay leaf, chile pepper, beans and water. Cover and bring to a gentle simmer, cooking on a low flame until beans are tender, about 45 -50 minutes. If needed, add a little more water to pot.

When beans are tender place mirin, miso paste, honey and spices in a small bowl with some cooking liquid from beans; mix well and add to pot. Turn off heat and allow beans to rest for 5 or 10 minutes. Taste and adjust seasoning.

Serve in pre- heated soup bowls garnished with chopped ripe tomato and cilantro or parsley. A little fresh squeezed lemon or lime juice adds a new dimension to cooked beans.